
Over the past year, I’ve fallen in love with Julia. Now most of my acoustics, signal processing, data analysis, and machine learning research is done in Julia. So it’s natural for me to ask how I can use Julia with UnetStack, as a lot of that research eventually finds its way into underwater networks via UnetStack. In this 2-part article, we’ll explore 2 different ways to get Julia and UnetStack to work seamlessly together.
Using Julia with UnetStack
There are essentially two different ways for using Julia with UnetStack, depending on your needs:
- Interfacing with UnetStack from a Julia script or application.
- Using algorithms written in Julia from a UnetStack agent.
In this article, we will explore option 1, where we write Julia code that needs to interface with UnetStack. In the follow-up article (part II), we will learn how to run Julia code from a UnetStack agent written in Java or Groovy.
So let’s get started…
UnetSocket API
If you’ve interfaced with UnetStack from Python or Java or Groovy or C, you perhaps are already familiar with the UnetSocket API. This API is also available from Julia by using the UnetSockets.jl package. To install it (need to do this only once), we fire up a Julia terminal and add the package:
1
2
3
4
5
6
7
8
9
10
11
12
13
14
15
16
17
18
19
20
21
22
$ julia
               _
   _       _ _(_)_     |  Documentation: https://docs.julialang.org
  (_)     | (_) (_)    |
   _ _   _| |_  __ _   |  Type "?" for help, "]?" for Pkg help.
  | | | | | | |/ _` |  |
  | | |_| | | | (_| |  |  Version 1.5.0 (2020-08-01)
 _/ |\__'_|_|_|\__'_|  |  Official https://julialang.org/ release
|__/                   |

julia> # press "]" to enter package mode
pkg> add UnetSockets
   Updating registry at `~/.julia/registries/General`
   Updating git-repo `https://github.com/JuliaRegistries/General.git`
  Resolving package versions...
Updating `~/Projects/unet-blog/Project.toml`
  [28ddc128] + UnetSockets v0.1.0
Updating `~/Projects/unet-blog/Manifest.toml`
    :

pkg> # press backspace to get back to Julia prompt
julia>
Once we have it installed, we can load it:
1
julia> using UnetSockets
Now we’re all set to start using it!
If you have a UnetStack-based modem, you can connect to it using Julia now. In this article, we’ll use the UnetStack community edition to test out UnetSockets.jl. In a new terminal window, we start the unet audio software-defined modem:
1
2
3
$ bin/unet -c audio
Modem web: http://localhost:8080/
>
If we type iface, we find that the API is available at IP address 192.168.1.4 over TCP port 1100:
1
2
3
4
5
> iface
tcp://192.168.1.4:1100 [API]
ws://192.168.1.4:8080/ws [API]
unetsh: console://- [GroovyScriptEngine]
websh: ws://192.168.1.4:8080/fjage/shell/ws [GroovyScriptEngine]
We use the IP address and port number to have a Julia UnetSocket connect to the modem. Your IP address may be different from the one shown above, so you should use that or use localhost, if you’re on the same machine.
On the Julia REPL:
1
2
julia> sock = UnetSocket("localhost", 1100)
julia-gw-3f9414be-e8ef-11ea-170a-49a52a81963d
Once we have a socket open, we can use it to broadcast (destination address 0) some data (“hello world”):
1
2
julia> send(sock, "hello world", 0)
true
The true indicates that the message was received by UnetStack. At this point in time, you should have been able to hear unet audio buzz an audio packet out. If you didn’t, it might be that the speaker volume is too low, as the default transmit power in unet audio is set to a safe low value. We can check it, and increase it, from Julia:
1
2
3
4
5
6
7
8
julia> phy = agentforservice(sock, Services.PHYSICAL)    # get PHY agent
phy
julia> phy[2].powerLevel               # check power level for DATA (2) channel
-42.0
julia> phy[2].powerLevel = -10.0       # increase power level to -10 dB
-10.0
julia> send(sock, "hello world", 0)    # now transmit again, and it should be louder
true
That was easy!
Working with the UnetSockets.jl and Fjage.jl
The Julia API to UnetStack is implemented as two packages:
UnetSockets.jl— implementation of UnetSocket APIFjage.jl— implementation of the fjåge gateway API
Fjage.jl is a dependency of UnetSockets.jl, and so does not have to be separately installed.
The entire UnetSocket API and fjåge gateway specification is available in Julia, but with slight changes for language conventions:
- The method names are all lower case instead of camelCase (e.g.
agentforservice()instead ofagentForService()). However, constructors use CamelCase (e.g.UnetSocket()) - Since Julia isn’t object oriented, the socket or gateway is passed in as the first argument to all the methods (e.g.
send(sock, ...)instead ofsock.send(...)).
You can get documentation on each of the methods by simply typing “?“ followed by the method name in the Julia REPL:
1
2
3
4
5
6
7
8
julia> # press "?" to enter help mode
help?> UnetSocket
search: UnetSocket UnetSockets

  sock = UnetSocket(host, port)

  Open a new UnetSocket via TCP/IP to communicate with UnetStack.
Baseband signal processing in Julia
In the previous example, we broadcasted a “hello world” message, but with just one unet audio modem running, there wasn’t anyone to receive it. If you have multiple modems, or multiple laptops to run unet audio on, you should be able to receive that message on the other modems. However, it is more likely that you’d want to harness the power of Julia for generating some signals to transmit using UnetStack’s baseband service, or process signal received by the modem. Let’s try some examples of this next.
Let’s start off by adding a couple of useful Julia packages:
1
2
3
4
5
6
7
julia> # press "]" to enter package mode
pkg> add Plots
	:
pkg> add SignalAnalysis
	:
pkg> # press backspace to get back to Julia prompt
julia>
Baseband signal transmission
Let’s generate a half-second 10-14 kHz linear-frequency modulated (LFM) chirp signal in Julia. Since unet audio uses a carrier frequency of 12 kHz and a sampling rate of 12 kHz, we can generate a baseband chirp from -2 kHz to +2 kHz:
1
2
3
4
julia> using SignalAnalysis
julia> x = chirp(-2000.0, 2000.0, 0.5, 12000.0)
6000-frame, 1-channel SampleBuf{Complex{Float64}, 1}
0.5s sampled at 12000.0Hz
If you are using a modem instead, you’d want to check your modem’s carrier frequency and baseband sampling rate. You can either do that on the modem’s shell, or directly from Julia:
1
2
3
4
julia> phy.carrierFrequency
12000.0
julia> phy.basebandRate
12000.0
Let’s check if our signal looks right:
1
2
julia> using Plots
julia> specgram(x)
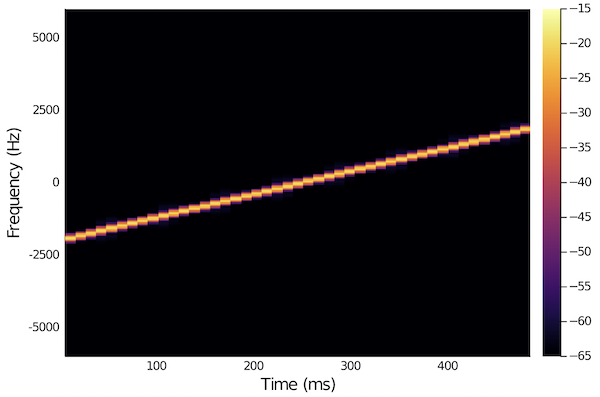
Looks good! Let’s transmit it:
1
2
3
4
julia> phy.signalPowerLevel = -10.0       # set the signal transmit power to -10 dB
-10.0
julia> phy << TxBasebandSignalReq(signal=samples(x))    # transmit the signal
AGREE
You should hear the chirp loud and clear!
Baseband signal reception
Let’s next try to get the software-defined modem to record an acoustic signal for us. This has a few steps, so it’s better to write a simple function that does this for us:
1
2
3
4
5
6
7
julia> function rec(duration)
         phy << RecordBasebandSignalReq()                # make a request to record (default duration)
         gw = getgateway(sock)                           # we need the fjåge gateway of the socket
         y = receive(gw, RxBasebandSignalNtf, 10000)     #  to receive the RxBasebandSignalNtf (10s timeout)
         signal(y.signal, y.fs)                          # return the signal and sampling rate
       end
rec (generic function with 1 method)
We have not included error checking for simplicity, but in a real application, you’d want to check that RecordBasebandSignalReq had an AGREE response, and that y was not empty (in case the receive() timed out). We have also given a 10-second receive timeout to allow for recording and some delays in the API and stack, although a smaller timeout might suffice.
Let’s try a recording, while I play a soft 9.5 kHz tone from my phone (so that unet audio has some sound available to record):
1
2
3
julia> z = rec()
65536-frame, 1-channel SampleBuf{Complex{Float32}, 1}
5.461333333333333s sampled at 12000.0Hz
We have a recording in z now. We can check if we see the 9.5 kHz signal in there:
1
julia> psd(z)
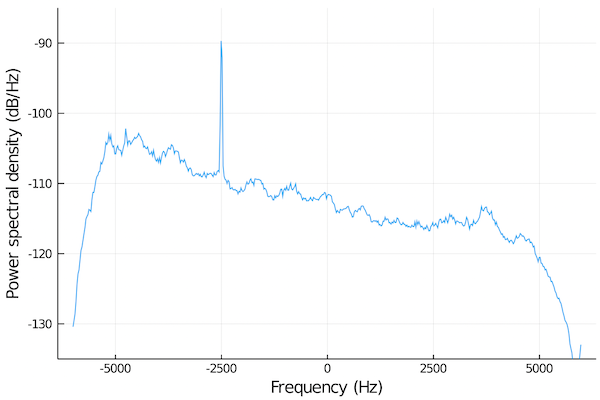
And there it is!